Friday, September 5, 2014

August Sketch Class card Three

For the third and final sketch card in August we went a little more masculine.  I made this card first so I had hand cut the pennants but for the class we used the dies.  The spiral boarder punch and the candy dots gave the card that little extra.  The Moonlight paper stack gave me a nice choice of paper to use.

Wednesday, September 3, 2014

August Sketch Class Card Two


The second card we did for Sketch Class was using almost the Same supplies as the first time except with Strawberry Slush Card Stock and the new Hearts Boarder Punch which I punched out and then cut with the now retired edgelit.  Stamps from the Good Greetings Hostess Set and from Something to Say.

Monday, September 1, 2014

August Sketch- part one


This is the first of the Cards we did for Sketch Class in August.  Using punches and framelits mad quick work of this complicated adorable sketch and the use of a paper stack made choosing coordinating paper a breeze.  The sentiments are from the Good Greetings set that is free till the end of October to Hosts with $300 in sales.  Enjoy and thanks for stopping by.


Thursday, August 14, 2014

Sketch Card Three from June

Here is sketch card three from June.  Vivid Vases Stamp.  Colored with the new Blendabilities Markers by Stampin' Up!  Then used the trimmer to cut it up into nine squares and arranged them on the slightly larger piece of Pool Party card stock. I used two new boarder punches the Hearts Boarder and the Spiral Boarder.  The Black stripe is retired but I'm sure any paper from the Back to Black paper pack would look great too!

Sunday, July 27, 2014

Sketch Card number two! Toucan!
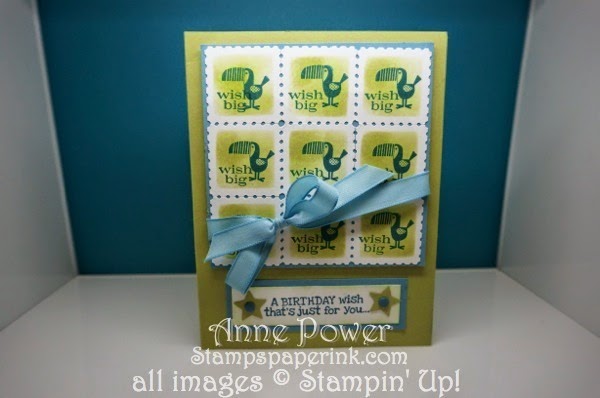
The next of my sketch cards I'd like to share is the ZOO Babies Toucan card.  Again it featured the Postage Stamp Punch for this one we used the one inch square punch to create a mask -we had done this in Technique class a couple years ago.  we punched out sticker paper with the Postage stamp punch and then adhered it to a window sheet and punched the center out with the one inch punch.  Then you line up the edges of the window sheet postage stamp over the punched out Postage stamp you are using on your project.  We used a sponge dauber to sponge Wild Wasabi ink into the window and then stamped the Toucan and the "wish big"  We repeated nine times and then I had everyone start in a corner and work their way out and up to aline the images.  I had used our adhesive sheets to back the Whisper White card stock so it was like we were adhering a sticker.

Wednesday, July 23, 2014

Sketch Card number one


 Here is the first of the three cards we did at my last Sketch Class.  I featured the much under used Postage stamp punch.  Crumb Cake and our lovely new Blue Lost Lagoon.  There is also a new embossing folder for the background and Polk-a-dot Pieces Stamp Set.  This seemed like an easy sketch until you try to get all your rows straight then ugh!  I did a sort of Umbra effect by stamping three shades of blue and stamping one twice three time each color. 
I think it is Lost Lagoon, Pool Party and Coastal Cabana.

Tuesday, July 22, 2014

June Hostess Club


 Embarrassingly late posting last month club project.  This was a big hit with my club stampers.

We used the Bundle that contains Flower Patch Photopolymer Stamp Set and Flower Fair Framelits Dies.  We cut one of the large flower and two each of the other flowers.  Fringe scissors were used to grass up the front mountain.


-->

Sunday, July 20, 2014

Technique Class for June-

 
-->
Starburst Card-Cut in half on diagonal one piece of DSP 4 1/2  x 1.5 and two different patterns of  DSP 4 x 1 1/2, 3 x 1 1/2 2 x 1 1/2.  Place a small punched circle one third of the way down from the top edge and one third of the way in from the left of a card stock piece 3 7/8 x 5 1/8.  Arrange the wedges of DSP in a star burst pattern with points toward the small circle.  stagger and alternate.  Cover the center with a stamped embellishment of some sort.  Trim all the edges of DSP that hang over the edges of the cardstock panel.  Mount on card stock mat and embellish as desired. 
I don't know where the time goes-I'm so behind on my blog posts!  I vow to do better!  Today I'm arriving back from convention and finally got my picture to load on to my computer so I'm sharing my Technique card from June.  It is a starburst technique that was so much fun to do.